
Crevice Corrosion
How can anyone trust a 36 to 48 year old boat, (which is what the Hughes 38s are), without verifying the condition of the keel bolts, and replacing them properly, including bedding the keel and retorking the nuts? In short, restoring them to new condition? Unlike when i was building Zenobia, crevice corrosion is well understood now, and the mechanism for conversion from passive to active surfaces on stainless steel is becoming common knowledge. How can anyone trust their boat offshore without a 100% trustworthy keel? i mean like, its the keel that keeps the boat on its feet, and if it falls off, (probably at the worst time possible) the boat falls over and you’ve got a bunch of big holes in the bottom. Estimates on the internet of $300 per bolt for repairing the bolts by a qualified keelmaker, make for a big bill, especially when yard fees, travel lift fees, and transportation are considered. But hey, we are buying our Hughes 38s at a BIG discount to similar boats, like the Catalina 38, the Cal 40, the Yankee 38 or the Hinckley 38. Your keel is not a place to pinch pennies. Most owners don’t hesitate to throw money at electronics that will be out of date in a few years, or niaseries (French Canadian slang) for creature comfort that haven’t the least thing to do with safety, or even so-called safety gear like AIS or SSB. What good will all of that do you when you are on your side, with water gushing in at 1000gpm? Its simple really, FIX YOUR KEEL FIRST.
Keel
Rebedding the Keel – Stella Blue
Keel Maintenance by William Souter
I Broomfield & Son in Providence, RI. said: “When replacing keel bolts, we melt the lead around the bolt, remove the old bolt (which is usually 304 SS), and replace it with a new bolt (316SS). The lead is replaced and the keel is faired and painted around the area. The cost is $450.00 per bolt. Depending upon the time of year, the number of bolts that need replacing and how busy we are it usually takes about 4-6 weeks. This price does not include freight. The re-attaching of your keel is usually taken care of at the boat yard, this is something that we are not involved with at all.”
Keel Bolt Replacement:
The best, strongest and safest method of keel bolt replacement is done by Mars Metals and a few others. This is the description from Mars:
“The bolt replacement process goes through these general steps:
• The damaged bolts are identified when the keel arrives.
• The bolts are removed through one side of the keel. This is done with a great deal of skill with a torch taking
the upper surface of the lead away.
• The old bolt is used as a pattern for the production of the new bolt. Most keel bolts are J hooked or bent in
some manner.
• Once the old bolt is removed there is a “saddle” of lead remaining, creating the position for the new bolt to
be held.
• The new bolt is fabricated from new matching material.
• The new bolt can even be welded back into the bolt cage right in the keel.
• The new bolt is fused into place. Lead is melted back on top of the new bolt, fusing the original lead and
the new lead, making the repair as strong as the original keel.
• The entire surface of the keel is faired, both sides.
• The root cord is cleaned.
• The remaining original keel bolts are cleaned and readied for installation on the boat.”
Keep Your Keel On – Sail Magazine
Taken from Maine Sail on Sailnet
There are a few ways to re-bed a keel and none of them, for me, would involve only a standard epoxy. Fin keels on older boats will move and flex some. They can be essentially a live joint unless you physically wrap the keel with lamination’s of glass which many have done after re-sets. Epoxy it on and it will still move or flex some. A flexible epoxy in conjunction with a marine sealant will work better.
Unfortunately standard epoxy has minimal elongation before break so when it flexes it will fail considerably quicker than a flexible marine sealant. A product like a polyurethane can have a flexible range of 450% to 800% of the joint thickness thus allowing for movement/flex and the differing expansion contraction coefficients between the lead and the polyester/glass laminate. On a low aspect lead keel the flex is much more minimal and epoxy may be an okay choice but on a fin it is a likely short life before water gets to the keel bolts unless it was of the flexible type. Some manufacturers use special epoxies from the factory but even builders like Morris use a polyurethane sealant.
The best method I’ve seen where epoxy is involved is to mix an epoxy butter and then heavily wax the lead keel & bolts, or use mylar tape, or better yet grease the bolts. Drop the boat onto the keel and epoxy butter, let it cure lift boat off. Now you have a nicely matched hull to keel joint like a cylinder head to an engine block. You can also do it in reverse but I prefer the bond of epoxy to fiberglass as opposed to epoxy to lead for the epoxy butter mixture though either is probably fine as epoxy is tenacious.
Next you take a Dremel tool and cut a shallow v-groove into the top of the lead face of the keel that meets the hull. A laminate trimmer and edge guide with v-bit works better if the keel is wide enough for it to fit. Go all the way around the keel about 3/8 to 1/2″ in from the outer edge until you complete a circle and the v-groove joins its self. Now apply a marine sealant, I like Sikaflex but 5200 is also good as is 4200, and drop the boat back down. The v-groove makes a nice thick gasket that can absorb lots more flexing than no thickness or minimal thickness. A 1/8″ thick bead at the v-groove, of 5200, 4200 or Sika will stretch and move a LOT more than 1/64th of an inch of sealant before a failure. 600% of 1/8″ is much more allowable movement than 800% of 1/64″.
Most all builders do not take the time to make a “gasket groove” or to “butter match” the hull to the shape of the keel. It involves a lot more time than builders are willing to exert or spend time/$$ on.
For anyone’s sake I would not advise solely the use of standard epoxy to bed a fin keel on a production boat. You may need some allowable movement as the forces on a fin keel are tremendous. I’ve yet to see very many that did not move some.
Any movement with standard epoxy will likely mean failure. Just because a fairing compound has cracked due to movement does not mean the marine sealant between the hull and keel has. All one needs to do is look at the raw number of boats in yards with fairing cracks along the keel/hull joint to see why using epoxy on an older hull as the sole sealant may lead to trouble. If the fairing cracks so then will the epoxy.
Here’s a link to a good description, of “butter matching” the keel/hull joint, though they did not cut a sealant/gasket groove..
Keel Bolts
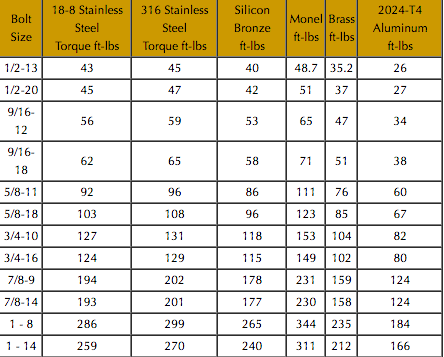
Torquing keel bolts properly is an important part of maintenance on a Hughes 38 – or for that matter any boat with external ballast. This is what is probably the best advice – subject to change as more information comes in. The Hughes 38 has 1″ (or possibly a little larger) stainless bolts and fine thread.
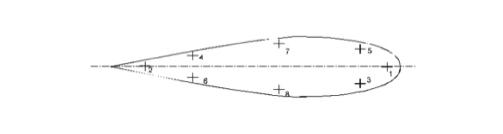
Minimum torque is 90 lb-ft and target is 100 lb-ft for the 1″ nuts. The 1″x 8 nuts take a 1 1/2″ socket. Keel bolts should be tightened in a staggered pattern as shown by Beneteau in this drawing:
Sources for Above Instructions:
Here is an email from Robert Hess:
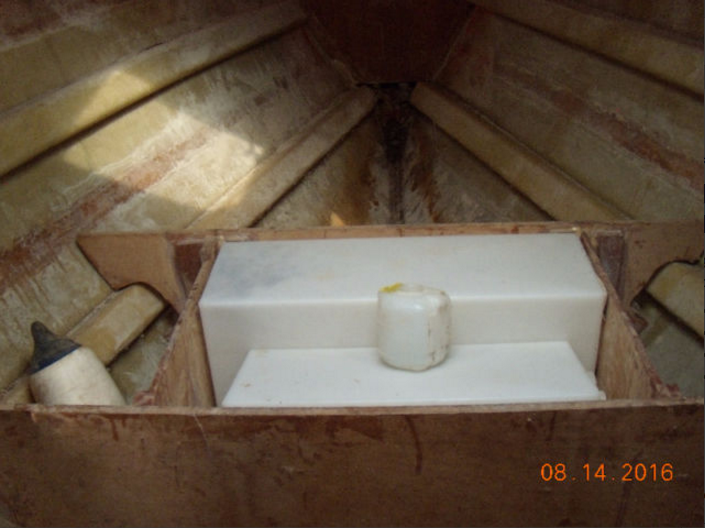
The Mast Step
Hughes sailboats were designed with a galvanized steel I-beam that runs from the mast step forward. The forward part of the keel is bolted to the bottom flange of this beam. Some were built without sufficient limber holes in the forward floors, which allowed water to pool under and on the galvanized beam causing it to rust. If this rust is serious, it would be expensive and difficult to repair. First signs of a problem with this structure would be a hairline crack between the keel and hull at the front of the keel.
Water Tanks
The water tanks in the original S&S design were specified to be made of monel, but they were installed as fiberglass with aluminum plates on the fore and aft ends.
Hull Deck Joint on Hughes Sailboats
The hull has an inward turning flange at the gunwale. On top of this flange is a double thickness of medium-soft rubber gasket. The deck was dropped on top of this and temporarily held in place with pop rivets. The toerail was then added, and holes drilled through the fiberglass and gasket for 1/4″ bolts. Tightening the bolts squeezes the rubber gasket around the shaft of the bolt.
(Commodore’s Note: This gasket is probably what Fatty Goodlander referred to as the “squashed inner tube”)
Reconstruction of a Columbia 38
Reconstruction of a Cal 40 Video Series – although not a Hughes 38, the Cal 40 is of the same general era as the Hughes 38 and some of the problems and solutions are shared with our boats. i happen to think that our boats were better designed and constructed than the Cal 40, but this video series is interesting nonetheless.
Hughes 38 Construction Details
Chainplate Detail – H38
Stringers Main Cabin – H38
Stringers Forward Cabin – H38
Thruhulls and Seacocks
Thru hulls and Seacocks by Raritan – while maybe not the “best” they meet all standards and are exceptional values.
PDFs of how to use the Tru-Design system
TRU SKIN PDF TRU VALVE PDF TRU COLLAR PDF
Thru Hulls – Mk III
Below water line – Raw water inlet, head inlet, head outlet, head basin outlet, galley sink outlet. 5 in all. Above water line – Two cockpit drains, exhaust outlet, bilge pump outlet, manual bilge pump outlet. 5 in all. Some owners report ball valves, others report gate valves on their boats.
Lotsa people talk about getting a wax ring for a house toilet for emergencies so that should be available, or buy some plumbers putty which will make less mess or spend the $60 or so to buy this gizmo:
Seabung – Replace your seacocks while afloat.
Antifouling
Good Source for Cheap Antifouling and Epoxy especially post #20

Good Source for Cheap Antifouling and Epoxy especially post #20
Do i Need to Strip MY Bottom Paint?
DIY Copper Antifouling especially post #114
Recipe for DIY Copperpaint: Copper 325 mesh 99.4% purity 2 Kg/liter of Westsystems 105 epoxy. Three coats, wet on tacky. Stir a lot. Regular epoxy, not aquaepoxy.
Is Coppercoat Antifouling Worth It? see post #114
Dustless Sanding – DIY device makes projects cleaner and easier.
Responsible boatyard work requires dust collection. Whether it’s toxic bottom paint or ordinary sanding dust, it still makes a mess and can ruin a neighbor’s paint job-in-progress. Dustless sanders have hose connections leading to vacuum cleaners, but unless it is a sophisticated vacuum with multi-stage dust separation, those filters clog and dust flies.

Even with a multi-stage, dust-filtering vacuum, there are drawbacks. All work stops when the shop vacuum is full. Cleaning or replacing dust filters becomes just one more expense, interruption, and irritation in the boat yard. And if you’re sucking up bottom-paint dust or horrible bilge filth, there is the matter of transporting that heavily loaded, bulky shop vacuum to a disposal site in the back of your car; will it tip?
The solution? Create a homemade dust-collection system using a five-gallon bucket with hoses attached to its lid. With a few common tools, $48 in parts, and 10 minutes of shop time, you can cobble together a simple dust-collection bucket that will get you through the longest day of sanding without interruption and that allows easy transportation of the waste to a disposal site.
We’ve used this easy, do-it-yourself tool for bottom sanding, bilge cleaning, shower sumps, blackwater cleanups, cold fireplace ash, and even pumping muck from a home sump pit. When the five-gallon bucket fills, just move the retrofitted lid to a fresh bucket and continue. Work speeds along, and the full buckets are much easier to carry and safer to transport, pour, or empty into bags than a full shop vac.
What You Need
5-gallon bucket $2.98
Screw-top lid $7.25
(2) 1¼-in. thru-hulls 2 x $7.99 = $15.98
1-in. PVC 45 elbow 48 cents
(2) 24-foot 1¼-in. sump hoses 2 x $10.98 = 21.96
Total $48.68
How to build it
The DIY dust bucket is essentially a five-gallon bucket with two through-hulls (inlet and outlet) attached to the lid and sump-pump hoses fitted to the through-hulls. One hose is attached to your sander (inlet), and the other is attached to a shop vac (outlet).
1. To create the bucket’s outlet fitting, mark a circle that’s the diameter of the through-hull’s threads in the center of the lid. Cut a hole for the through-hull using a hole saw (best) or saber saw. Trim the through-hull flange to fit around the molded ridges on the lid (hole saw also works well for this). Repeat these steps for the bucket’s inlet (from sander), placing the through-hull as close to the lid’s rim as is practical.
2. To finish the inlet from the sander, caulk or glue (polyurethane caulk works well) the PVC 45-degree elbow inside the through-hull’s rim fitting, on the underside of the lid, roughly parallel to the bucket’s wall; this will create swirl.
3. To complete the sanding kit, add one or two 24-foot sections of 1¼-inch sump pump hose, creating a super-light kit that will easily reach your boat’s entire bottom without having to move the vacuum as you work. (This hose generates an horrendous whistle when used as an open vacuum line, but when restricted for use with a sander it is quiet.)
Adjust the fitting sizes to suit your vacuum hose. We also recommend buying an extra screw-top bucket lid for transporting the waste to disposal, and buy as many spare buckets and lids as the work may require.
To test the effectiveness of the dustless sanding bucket, we used it with a cheap, thrift-store vacuum designed for small jobs the last time that we sanded the bottom of our 34-foot catamaran. The vac had a tiny paper filter, which clogged quickly when used alone. With it attached to the bucket trap, we finished the entire bottom-sanding job—many hours later—with no reduction in flow, and the mess was entirely contained in a single bucket.
The Bottom line
The total tally for the DIY dustless sanding bucket rang in just under $50 and took about 10 to 15 minutes to make. Testers have found that compared to using a shop vac alone, it made sanding easier (no vac to lug around) and it was effective, plus it makes cleanup and disposal a breeze.
A commercial version, the Oneida Air Systems Dust Deputy (www.oneida-air.com), is available for about $100 for the full kit (including hose and bucket). In our opinion, it’s better suited for the serious home woodshop than the boat yard. While it does work well, the extra complexity and expense do not seem justified at the lower airflow rates required for sander-dust collection, in our opinion.
Miscellanous Links
String of Pearls – Tidbits from Don Casey
The Stingy Sailor – Greats Ideas for Saving Money
Good article, but in my opinion, he is wrong about bedding deck fittings. Use butyl tape. Here is how: Butyl Tape
Hull Numbers – They were stamped on a metal plate riveted to the side of the cockpit near the transom.
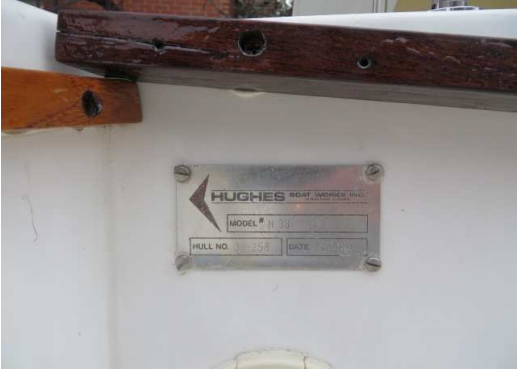
From a Mk 3 Hughes 38
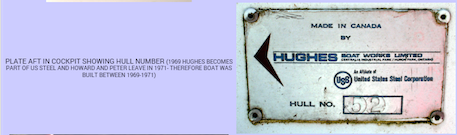
From and unknown Hughes boat
Deck Repair
Hull Construction
Some have alledged that the Hughes 38 uses balsa coring in the hull above the waterline. Here is an email i received from S&S:
| Jon,
Thank you for your email and your interest in the Hughes 38. Based on the information we have here in the office, it looks as though the hulls were entirely single skin fiberglass. However, this could have been modified post-design by the builder – so the only certainty I can provide is that the original design did not account for it. I hope this is helpful. Best Regards, Jason Jason Black Chief Operating Officer
|
The Stingy Sailor – Greats Ideas for Saving Money
Reconstruction of a Columbia 38
Cal 40 Restoration Video Series
String of Pearls – Tidbits from Don Casey
3 Simple Steps to Reduce Condensation
Gougeon Brothers on Boat Construction PDF