Sails
Good Discussion on Removable Stay
The following Youtube about use of a Screecher for upwind light air work.
Jeff H. on Singlehandling – lots here on spinnaker flying singlehanded
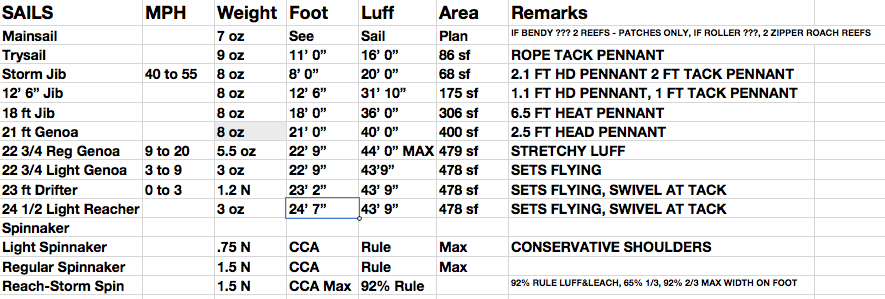
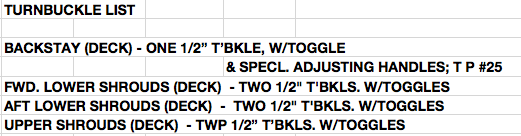
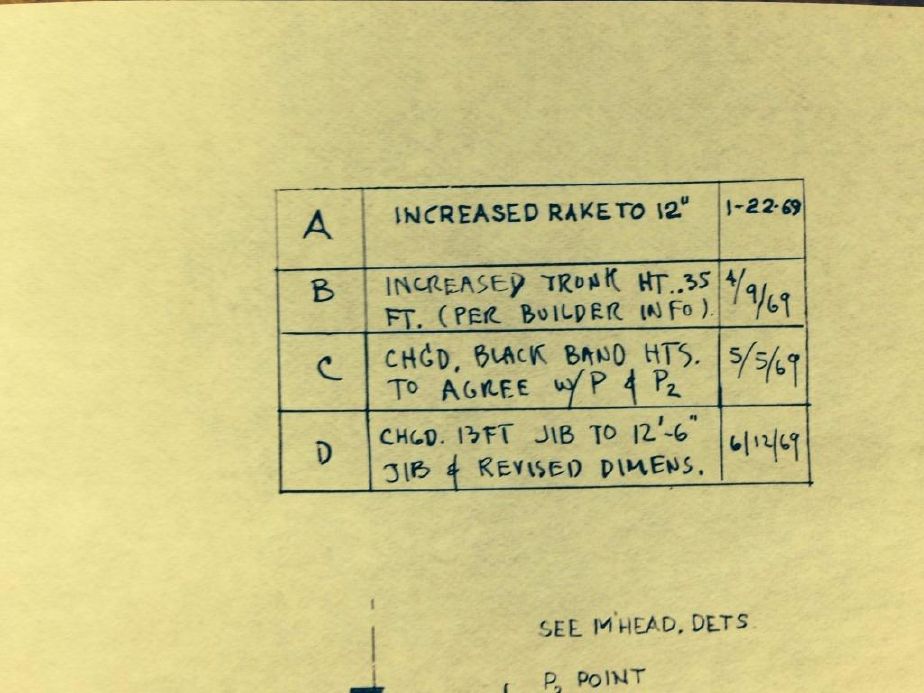
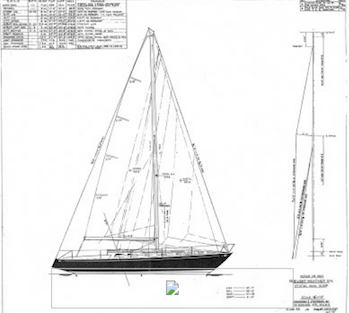
Sail Dimensions and Turnbuckle List
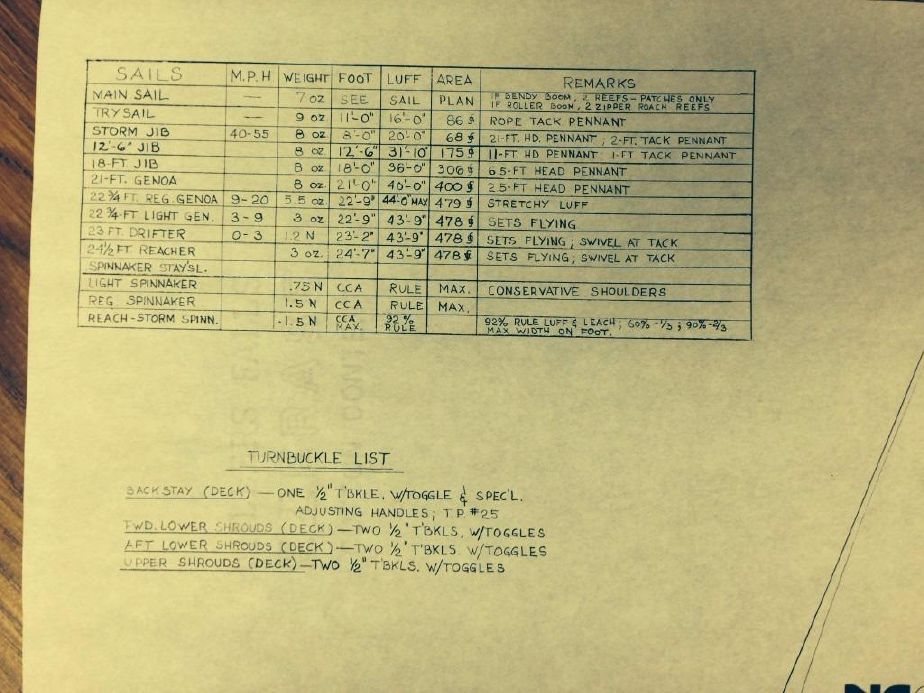
Commodore’s Best Attempt to Read Sail Dimensions
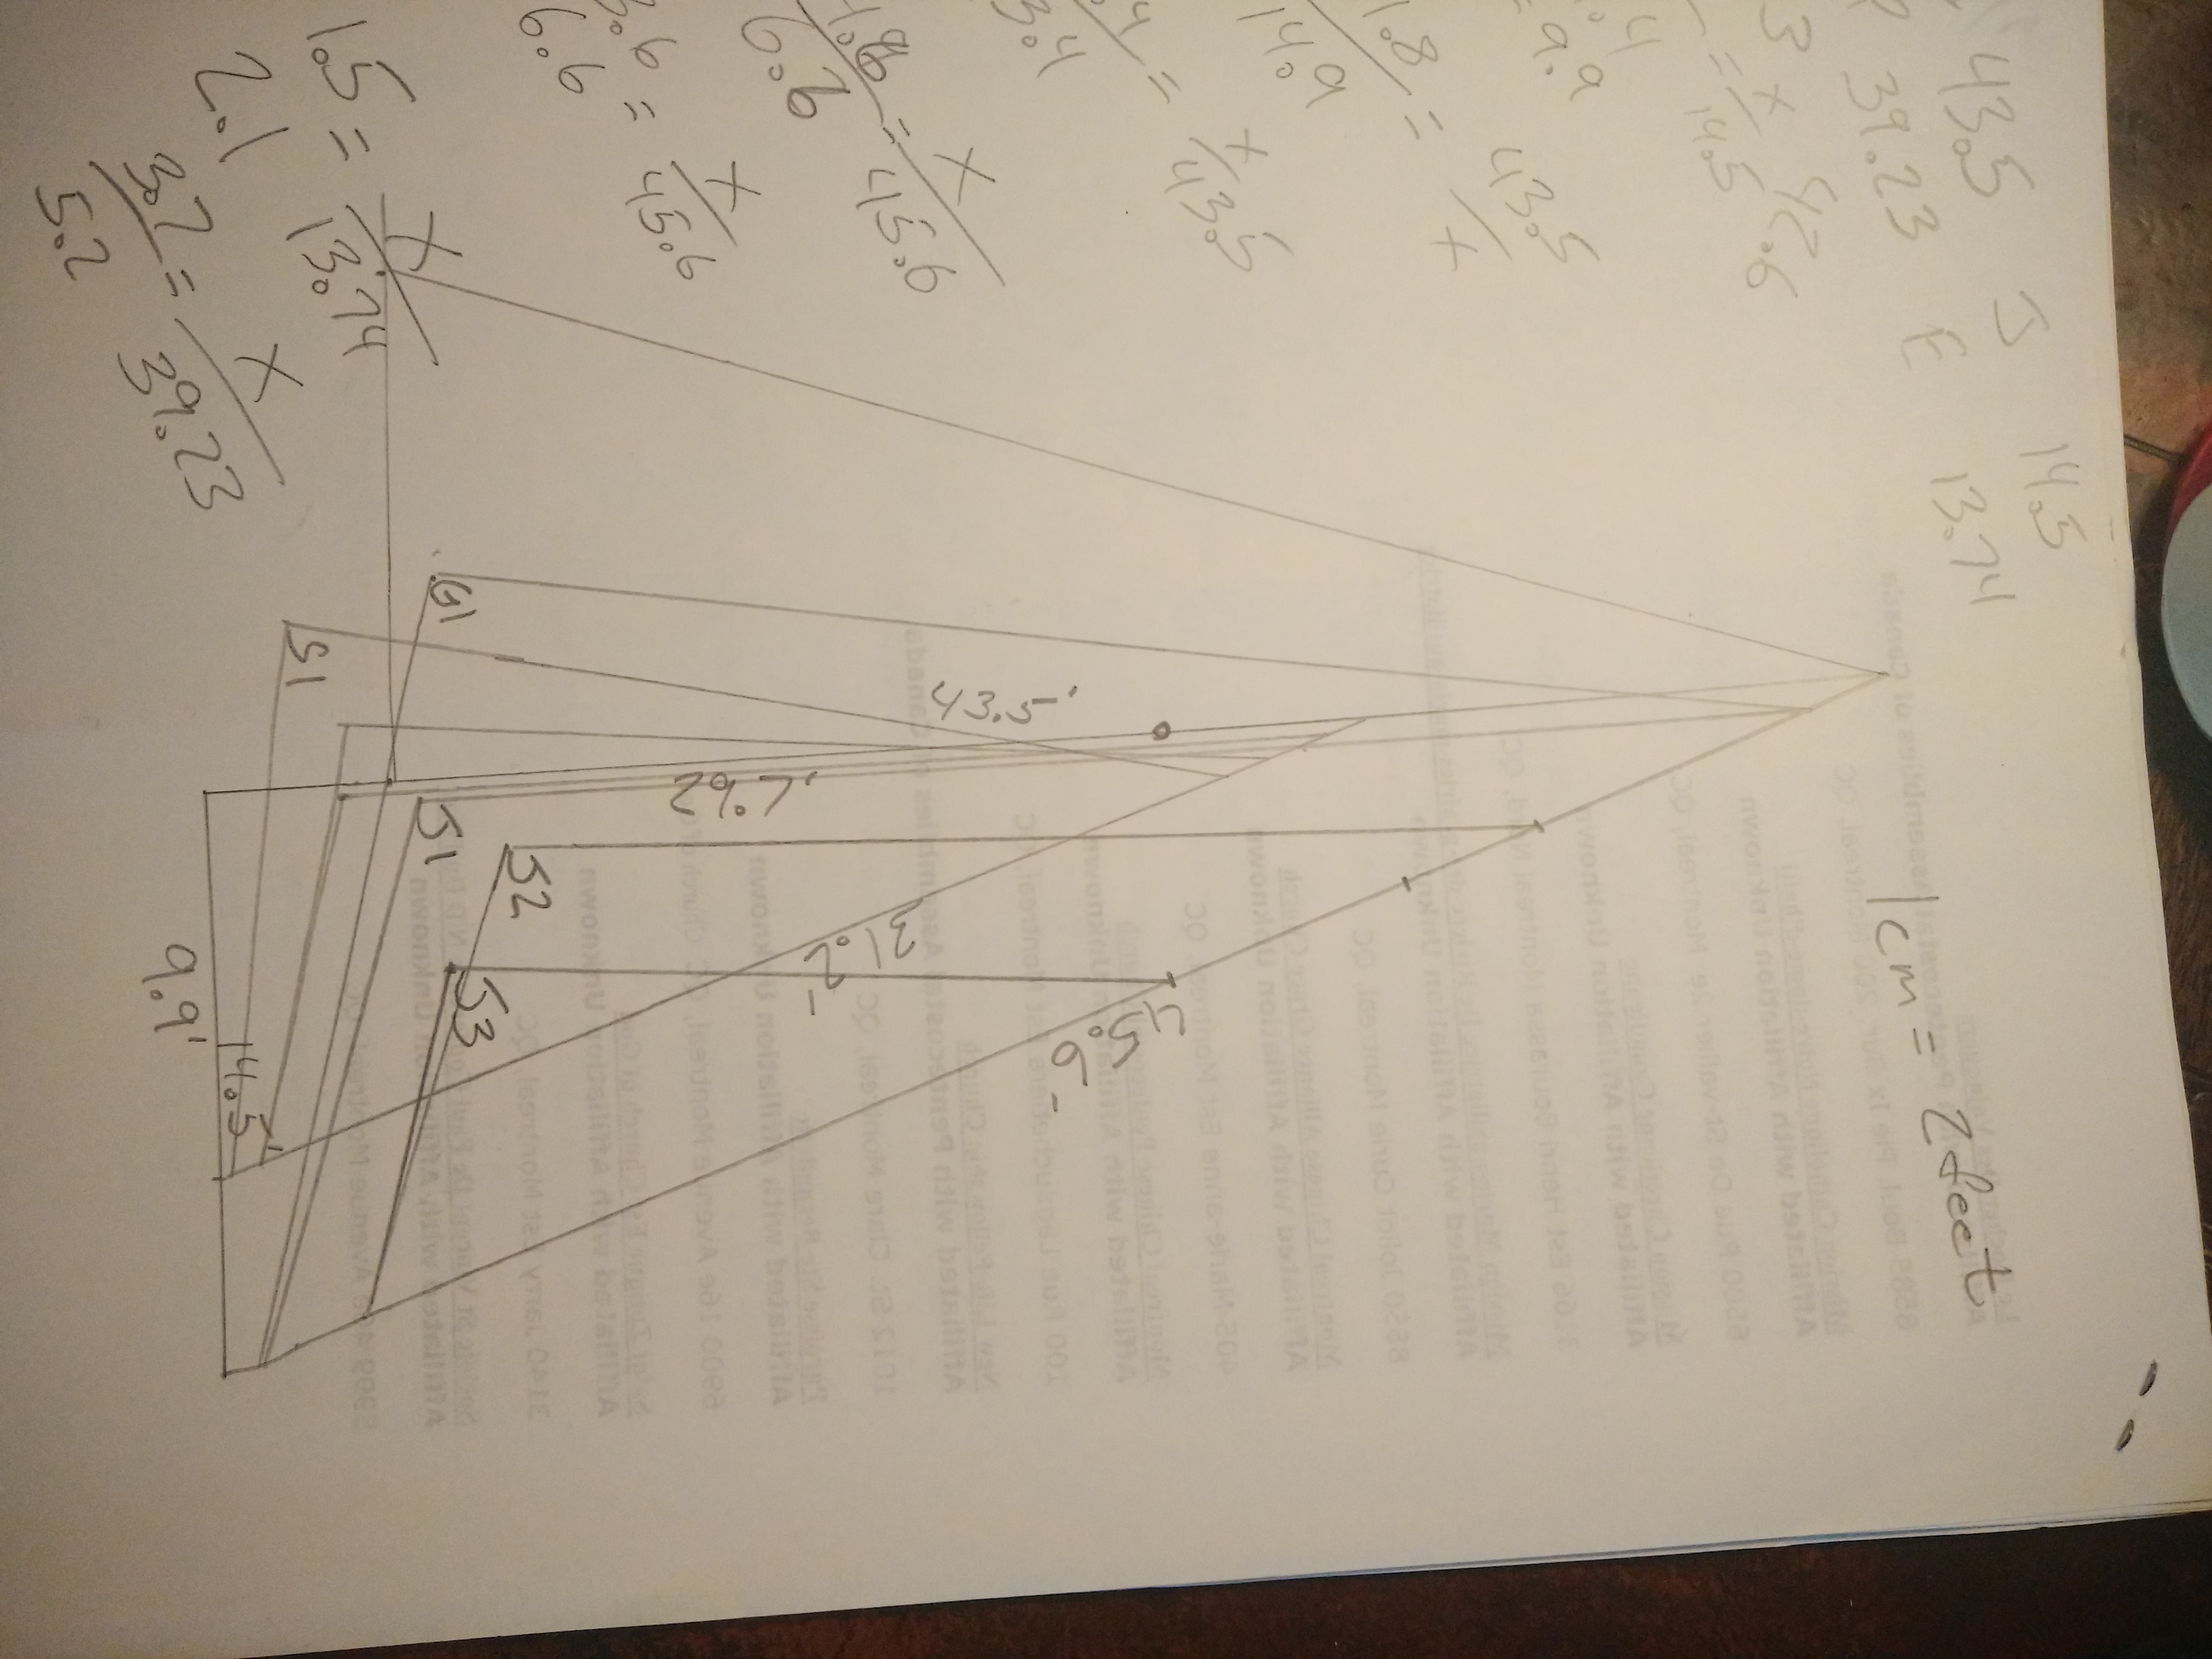
Commodore’s Attempt to Specify Sail Dimensions – Double Headsail Rig (based on Donald Street – The Ocean Sailing Yacht Vol 2 pgs. 199-201)
Genoa Staysail – Luff 27′ – Leech 24.8′- Foot 14.4′
Staysail – Luff 29′ – Leech 25.6′ – Foot 11.4′
Genoa – Luff 42.6′ – Leech – 36.2′ – Foot 20.6′
#1 Jib – Luff 42.6′ – Leech – 36.2′ – Foot 14.6′
#2 Jib – Luff 30.7′ – Leech – 24.6′ – Foot 12.4′
#3 Jib – Luff 21.8′ – Leech – 18.4′ – Foot 9′
Storm Trysail – Luff 27.9′ – Foot 9.8′
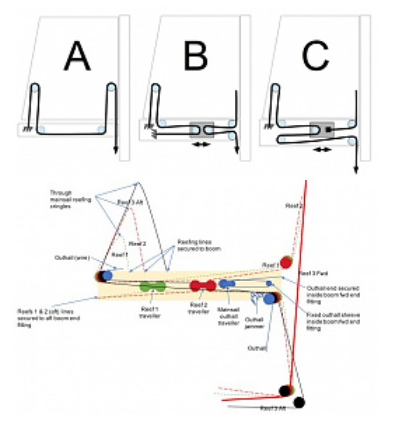
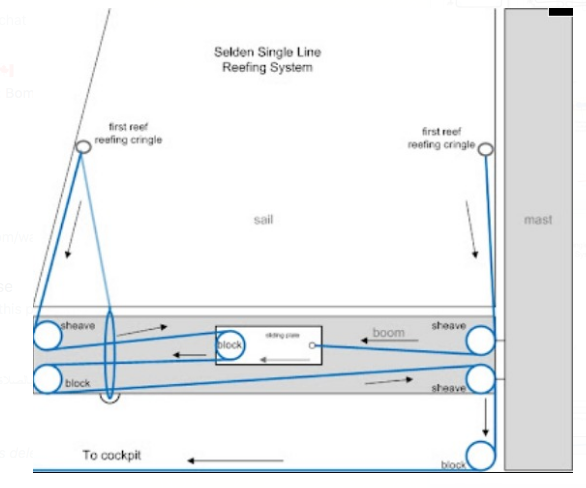
Reefing
Rig
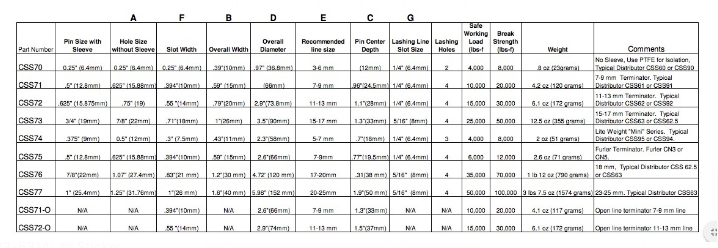
Colligo terminals specs.
WinchRite – Expensive but looks really cool
Milwaukee Hole-Hawg – A lot less money and looks more rugged – only 1.5 lbs heavier
Milwaukee Hole-Hawg – Specs
N speaking of winches, this grease comes highly recommended:
Synthetic Rigging
From Practical Sailor:
Sta-Loc Marine Outfitters Canada
Climbing the Mast
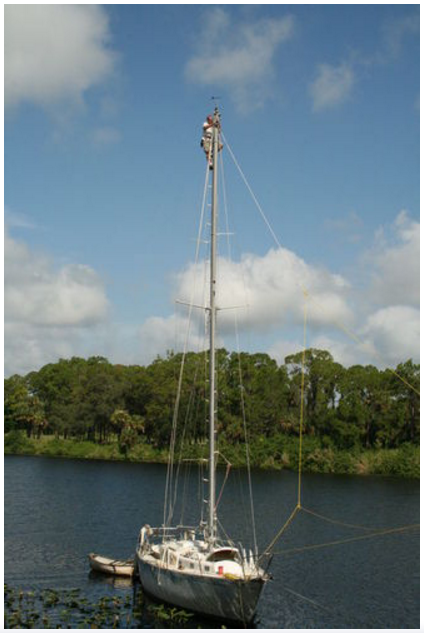
Rope and PVC pipe ladder attaching to mast with sail slides. Safe and easy way to ascend the mast. Can do it alone! Name of H38 unknown.
Commercial Version of Above Ladder – Mastmate
Discussion on a Staysail Stay for a Hughes 38
Selden – Rig Tuning Manual – PDF
Adjusting Your Rig – The basics of tuning your rig.
Splicing Instructions from Samson
Thoughts on Dyneema Standing Rigging
Synthetic standing rigging would save a LOT of weight aloft over conventional SS 1×19 wire. The Hughes 38 is rigged (i believe, however still needs confirmation) with 5/16″ wire rope. This means that the appropriate Dyneema standing rigging would be 3/8″ (or 9mm). i priced out rerigging using SS 1×19 with StaLoc terminals vs Collego Dux with sailmakers thimbles. All work is DIY. No tax or shipping included. $2400 for SS vs $2600 for the Dyneema. All prices in US$
Commodore’s Best Attempt to Read Turnbuckle Dimensions
Rigging Changes for Hughes 38
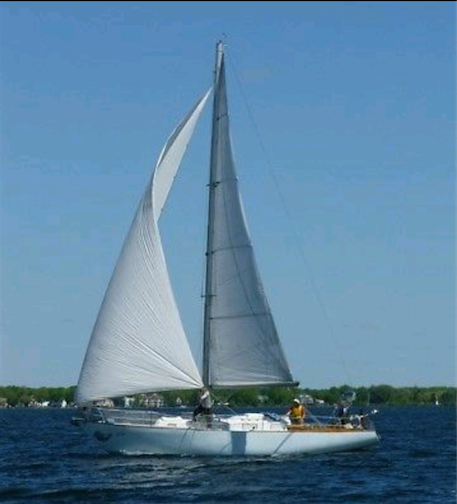
Tall Mast (Light Weather Rig) – i figure that the mast height of the tall rig is 4′ higher than standard. Many tall rigs (SV Clarity for example) have double spreaders. I=47.5′ J=14.5′ P=43.23′ E=13.74′ The sail area of the tall rig is 648 sqft (according to my calculations), giving a SA/disp ratio of 17.5.
Clarity Under Sail – Notice the Double Spreader Rig – Tall Mast

Hinckley 38 Rig – Taller than the Standard Hughes 38 Rig
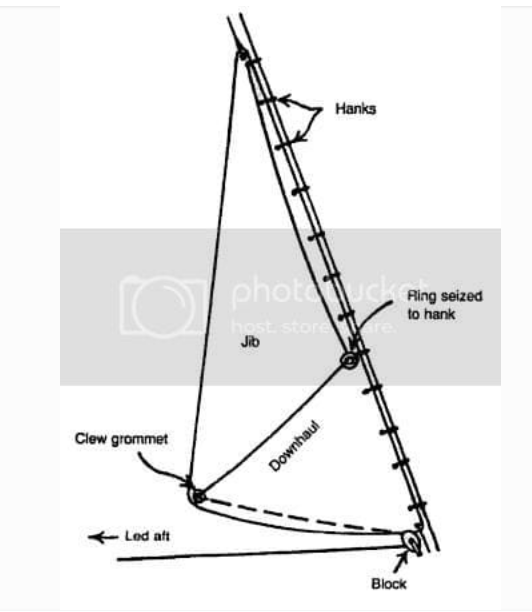
Installing a Staysail Stay
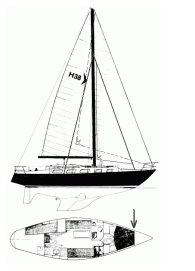
A Hughes 38 is an ideal sloop to convert to a cutter. It has a large foretriangle and a small main, making it ready for a conversion to a twin headsail. In addition it has a bulkhead in a great location for attaching the chainplate for the staysail stay. You will want to add intermediate shrouds if you have the single spreader version (the twin spreader version already has intermediate shrouds) and running backstays too. See attached sketch. Big arrow on the lower plan view drawing shows where I would expect the bulkhead to be.
|
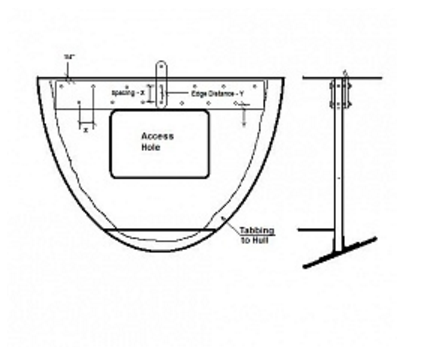
A 3/4″ bulkhead that is tabbed to the hull on both sides would be fine. If the bulkhead is just a partition that is not tabbed, sounds like you need to do some fiberglass work. If the bulkhead is particleboard and not real ply, I would think about replacement, though I have seen some on boats.
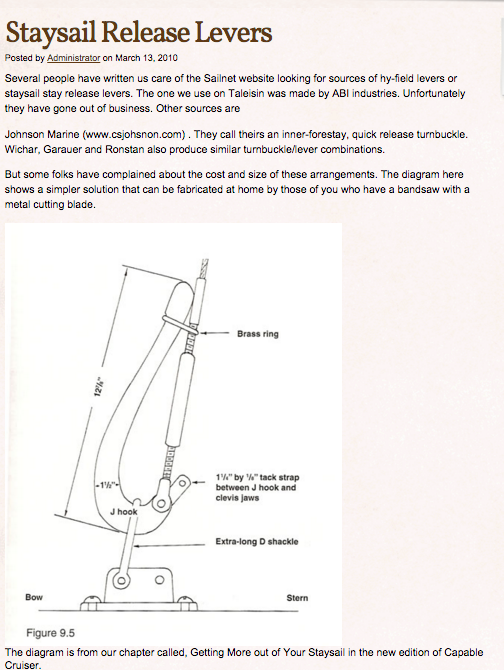
The next question is how much meat is there at the top of the bulkhead, undoubtedly an access has been cut to access the chain locker and to allow maintenance of the headstay chainplate. Specifically what is the distance from the top of the opening to the top of the bulkhead? To figure out what is enough you need to know how long the chain plate needs to be. To determine the chainplate size you need to know forestay size. The only reference I have that discusses forestay (aka. staysail stay) size is Skene’s Elements of Yacht Design which indicated it should be the same size as the headstay. Discussions of Skene’s in other references indicate that Skene’s is very conservative on headstay size to begin with and is really overdone if there is a forestay too. Given that discussion and the fact that dead loads in the fore and aft direction will now be carried by 2 stays instead of one so I would be comfortable using the smallest wire size used in the existing rig, probably one of the shrouds. It may be that all of the wire is the same size in which case go with that. Knowing the wire size will give you the turnbuckle size, which will in turn give you the pin size assuming you stay with standard sizes. For arguments sake lets assume a 1/2″ pin. A standard flat chain plate (you would need to bend the top over to suit) would have 5-1/2″diameter bolts thru the bulkhead at 2-1/8″ centers. Given the need for meat below the bottom bolt and space for the nut and wrenches on the top bolt lets say you need 5 spaces or 10-1/2′ of bulkhead. It’s kind of iffy that there will that much meat in the bulkhead over the access opening. Given the need to access the headstay chain plate for inspection and maintenance you don’t want to fill up this opening. The number of bolts into the bulkhead is based on the bulkhead capacity, not the bolt or chainplate capacity so if the bulkhead were stronger you could get away with fewer bolts. In which case I would be comfortable with 2 bolts and happy with 3. In order to make the top of the bulkhead strong enough I would get 2 plates of stainless 1/4″ less in width than the maximum amount of meat in the bulkhead over the opening, same thickness as the chainplate (1/4″ minimum) and long enough to span from the tabbing on one side of the boat to the tabbing on the other. I would not run these plates onto the tabbing. The plates need to be scribed and trimmed on the top to follow the deck and leave the 1/4″ gap to the deck. If the deck is flat then no trimming will be necessary. Once the plates are installed THEN cut the deck for the chainplate, that way you don’t get it in the wrong spot, the most obvious mistake would be to cut the deck at face of bulkhead rather than the thickness of the plate forward of the bulkhead. Now install the chainplate. You will need to bed around the chainplate the same as all others on the boat. See attached sketch for how I would do it. This give you a tang sticking up out of the deck that a turnbuckle could be attached to. Securing the tack of the sail will take some additional thought. Alternatively install a 90-degree toggle and an extra long shackle onto the tang. With that in place you can install a Staysail Release Lever from Lin & Larry Pardey’s website. Now you have a removable staysail that won’t impede short tacking with the headsail. |
SV Verdia

SV Wildcard – Showing the Staysail
Custom Rigs
SV Globi
Note the double spreaders on this custom rig. Globi was damaged by a drawbridge, and the whole rig was replaced by the insurance company. It appears that the mast is a teardrop shape rather than an oval, and the boom is improved as well. The upper shrouds and the intermediates are both joined to the same chainplate. It also appears that the mast is taller than original, although i am unable to verify.
Double Spreader 7/8 Extra-tall Rig (52′ from water)
SV Anole, 7/8 Rigged Exterior Chainplates